Too Many Bones (Chip Theory Games, 2017)

Basic details: 1-4 players; 60-240 minutes; cooperative; quasi-automa solo mode (have to control Baddies, which in fairness you would also have to do in a multiplayer game)

Dates played: May 25 & 27, 2021

Gist of the game: Strap in everyone. There’s a lot going on in this game.

You are a creature known as a Gearloc, tasked with successfully fighting a Tyrant within a specified number of days. You will work together with your fellow Gearlocs in the battles leading up to the Tyrant showdown, as well as in that battle, to rid the area of villains and make it safe for Gearlocdom.

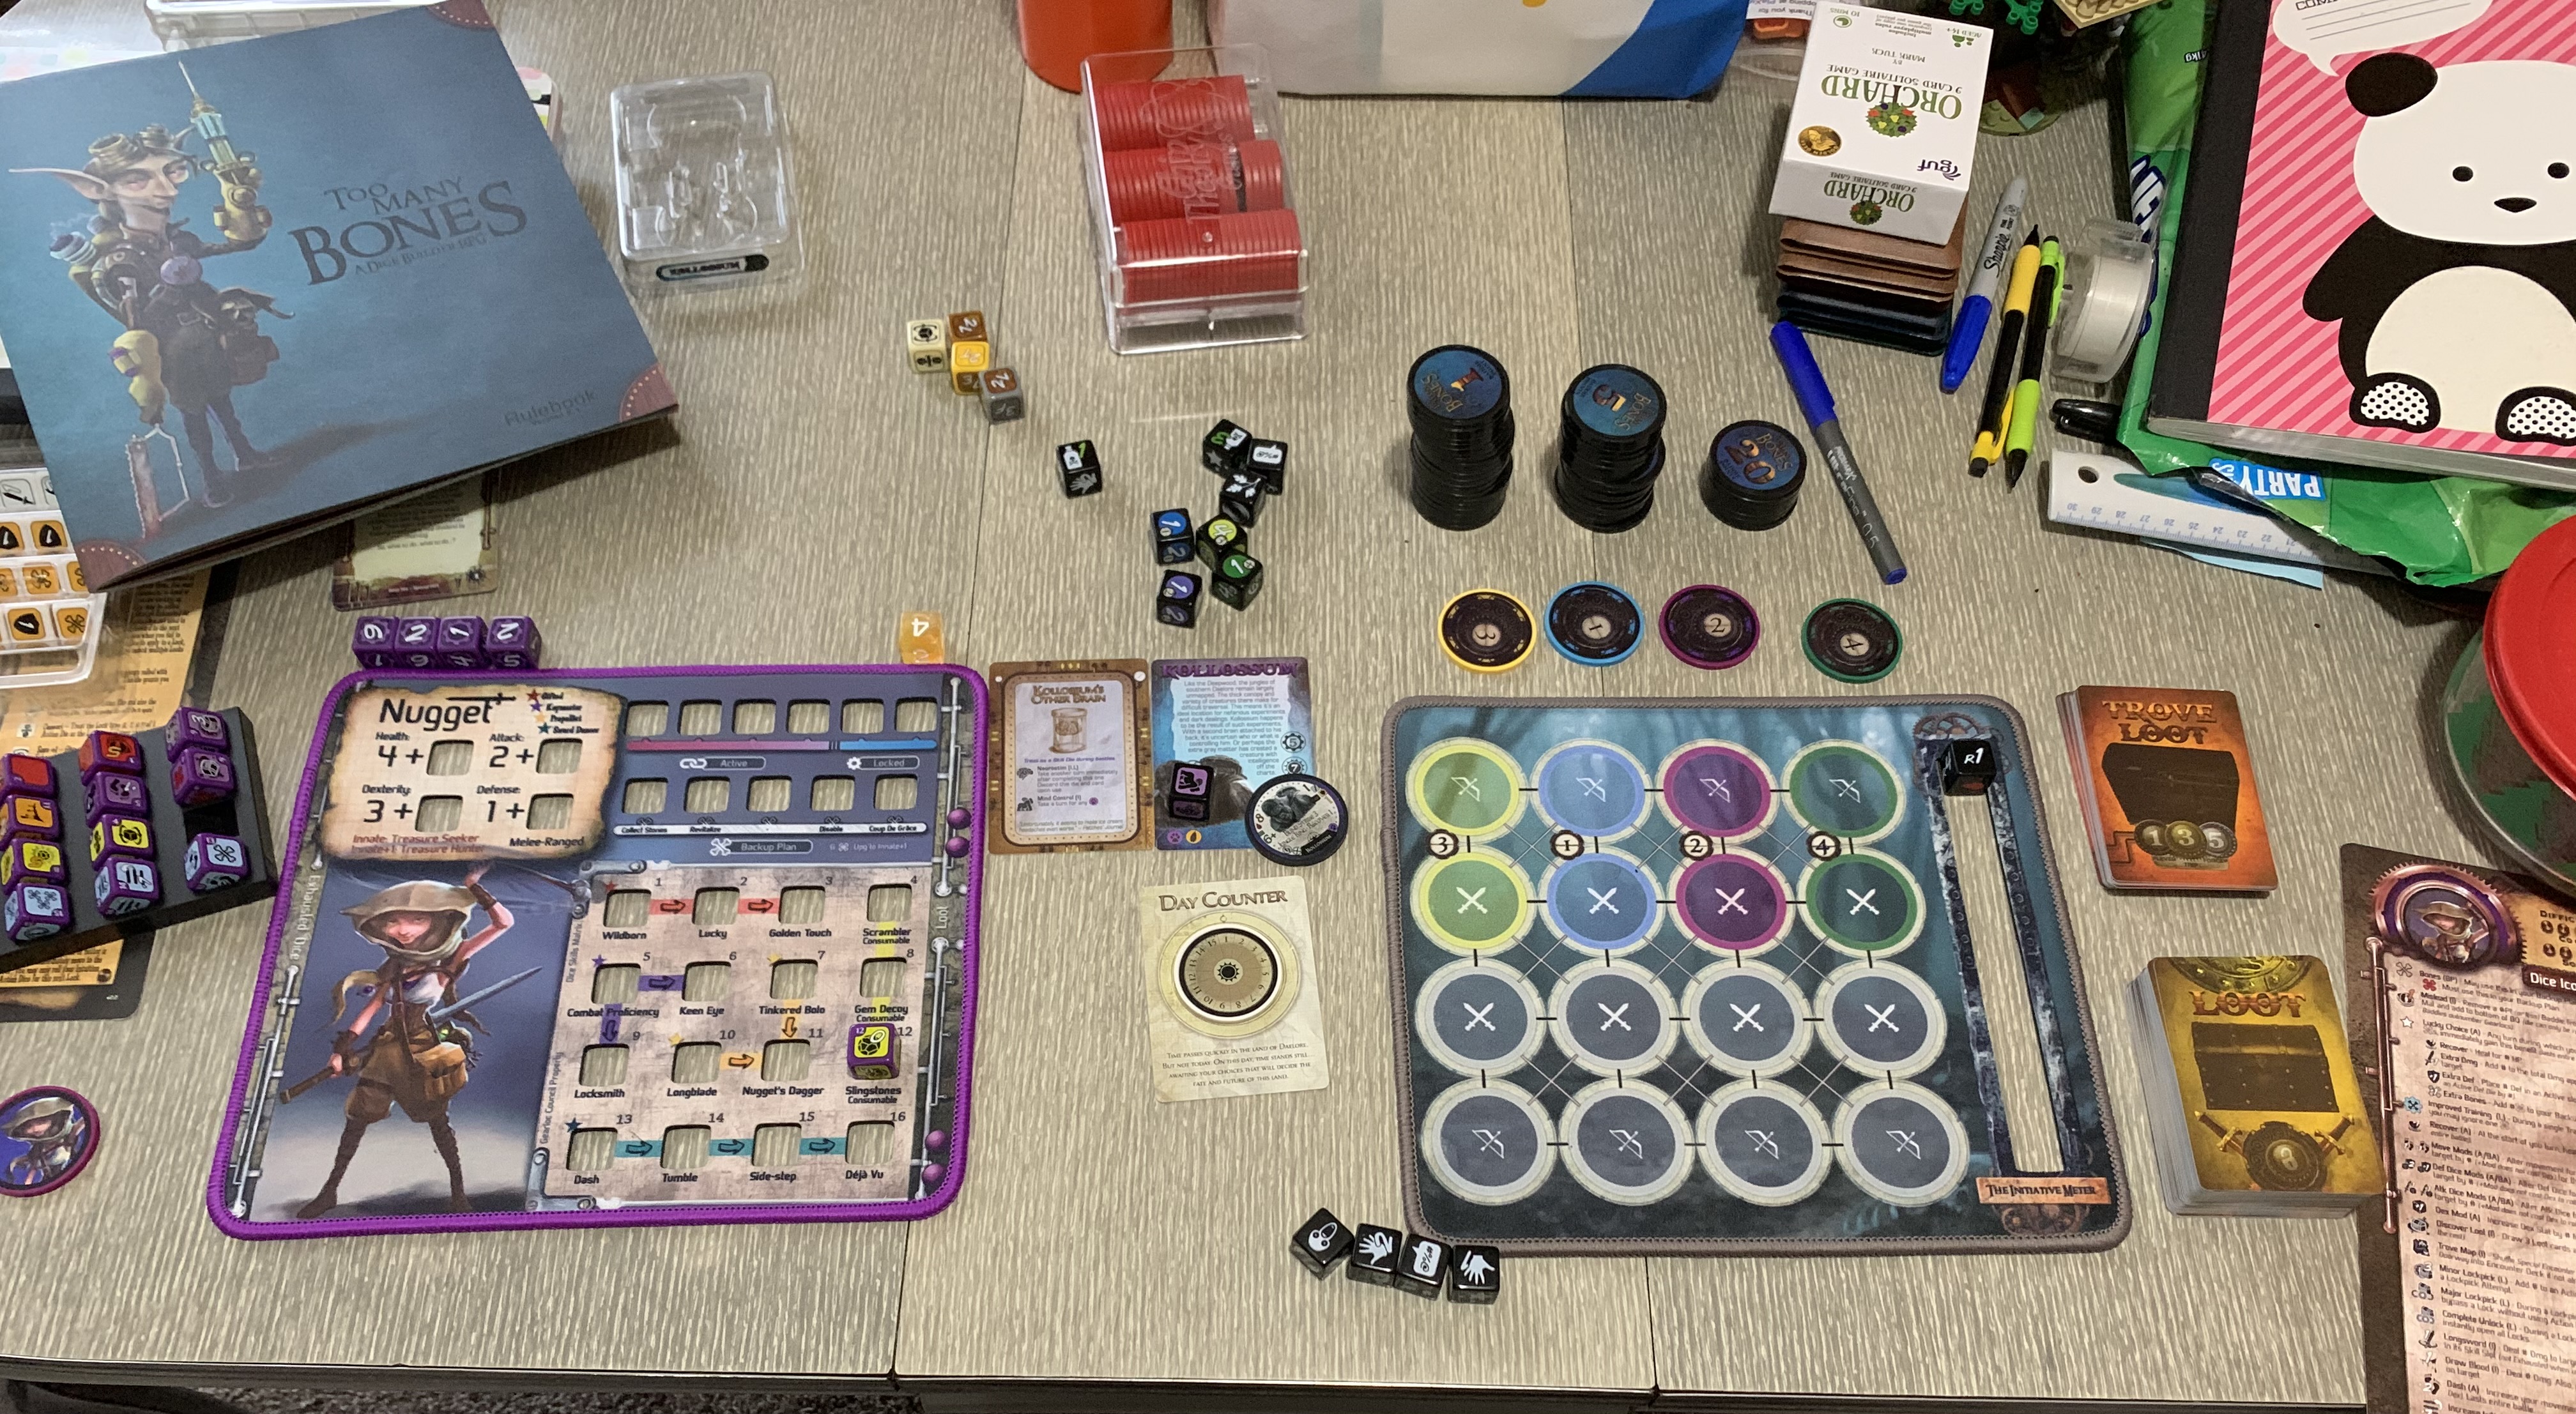
To set up the game, choose a Gearloc and take their associated character mat, chip, health chips, reference sheet, and dice and place them in front of you. Place the battle mat in the center of the table, along with the lane marker chips, relevant Baddie chips (depends on Tyrant) sorted by point value, and health chips (above the battle mat) as well as the attack dice, defense dice, effect dice, and regular D6 (below the battle mat). The counter die for rounds is placed at the top of the initiative meter on the battle mat and is set to R1 (for the first round of battle). Select a tyrant and take its card, chip, and possible die and place them to the left of the battle mat. The day counter card and chip are placed immediately below the Tyrant card/chip.

Take the Tyrant Encounter cards and shuffle them in with a number of Encounter cards equal to the number of days indicated on the Tyrant card minus 3. Set this Encounter deck below the day counter card to the left of the battle mat. Place the Special Encounter cards 1-3 on top of the Encounter deck.

Loot and Trove Loot cards get shuffled separately to create 2 decks, placed facedown to the right of the battle mat. The 4 lockpicking dice for Trove Loot are placed nearby.

Baddies are sorted by type and selected for a particular game based on the types indicated on the Tyrant card. Baddies are stacked by point value into separate piles.

For the Gearlocs, place dice as appropriate in the skills area of their mat based on the skills they begin the game with (indicated on their reference sheet).

The game proceeds over a series of days. Each day consists of 4 phases. In the first phase, players advance the day counter 1 day (starting with day 2). Next, players draw an Encounter card. If the Gearlocs have accumulated enough progress points to be able to challenge the Tyrant, they can do that instead of drawing a new Encounter card. Players resolve the Encounter card, either making a choice and attempting to complete it, or otherwise carrying out the instructions on the back of the card. If they are successful, they proceed to the reward phase. If they are unsuccessful, they instead proceed directly to the recovery phase.

In the reward phase, players gain all the relevant rewards pertinent to their choice as well as any rewards that are general to the Encounter. Any rewarded Loot and Trove Loot cards are drawn. Any training points rewarded are used. Any progress points that are rewarded are placed with the number of points visible under the Tyrant card.

In the recovery phase, players may swap any Loot amongst themselves, or discard any unwanted loot. Players then make a lockpicking attempt on one locked Trove Loot. Finally, players choose one of 3 individual actions to perform: a) heal to full HP; b) discard 1 (Trove) Loot and roll 6 attack dice. For each bones symbol rolled, the player reveals a Loot card, choosing 1 overall to keep. The player must discard a card in order to search for more Loot; if they roll no bones, they cannot reclaim the discarded card; c) roll a D6 and reveal the appropriate Baddies: 1 pt Baddies for rolls of 1-3; 5 pt Baddies for rolls of 4-5; and a 20 pt Baddie for a roll of 6. When revealed, Baddies are replaced face up in their original position in the stack or flipped face down and placed on the bottom of the stack.

Encounters function as days, with each day revealing a new Encounter card. The front of the card describes the Encounter, and the back of the card provides a list of (up to 2) choices and the effects of those choices and the effects of those choices on the Encounter, as well as the rewards that can be gained from a successful Encounter. Players must collectively choose 1 choice, which will result in either a peaceful outcome or a battle. Choices must be successfully completed in order to earn rewards. Rewards specific to the choice are listed alongside the choice. Rewards general to the Encounter are listed at the bottom of the card. General rewards may include progress points, training points, Loot, and Trove Loot.

Peaceful outcomes are automatically successful unless otherwise specified. A battle is successful if at least 1 Gearloc remains conscious after all Baddies have been defeated.

There are 3 types of Encounters: Special Encounters, which are added to the Encounter deck only when specifically instructed, either during set-up or by another Encounter; Tyrant Encounters which depend on the Tyrant selected; and regular encounters, with different sets for solo games and games with at least 2 players.

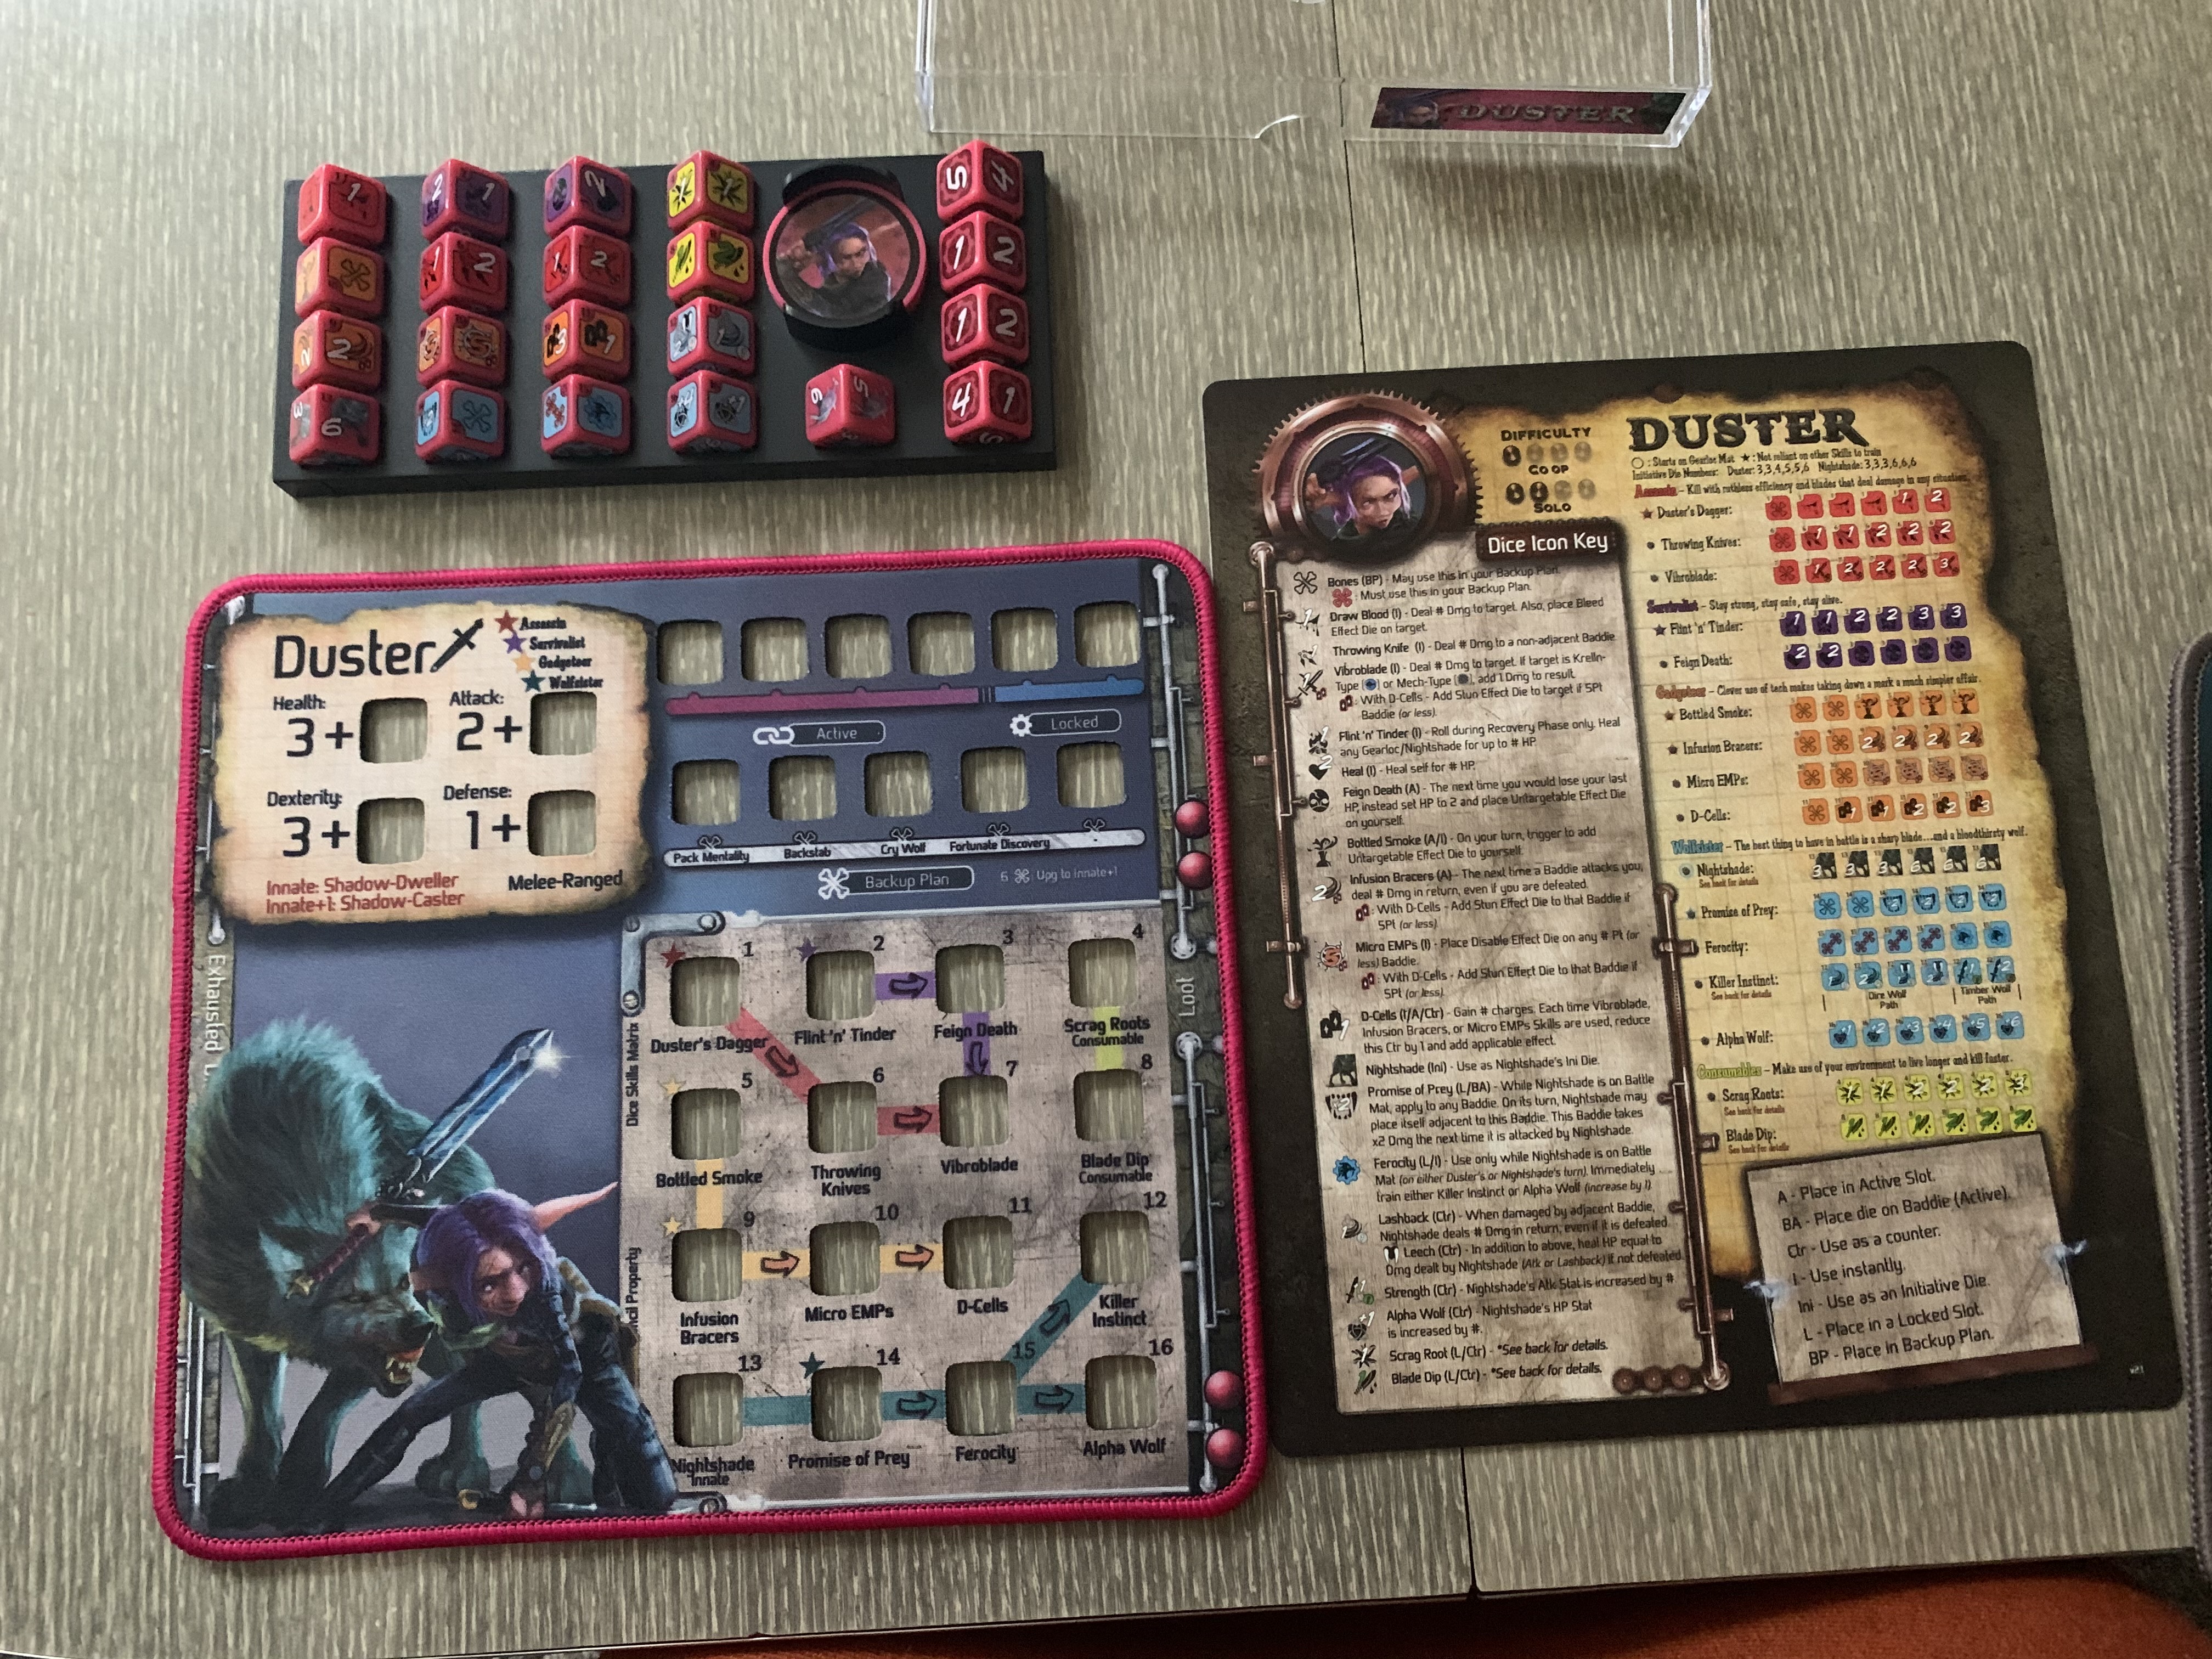
Each Gearloc has an associated mat, which contains a significant amount of information as well as a landing place for dice during the game. Mats have 8 areas: 1) stat area; 2) exhausted dice area; 3) prep area; 4) skills area; 5) Backup Plan row; 6) active slots; 7) locked slots, and 8) loot.

The stat area contains basic information about the Gearloc: a) health points; b) dexterity; c) attack strength; d) defensive strength; e) type of attack (melee, ranged, or melee-ranged). Gearlocs have starting stats that are then augmented by dice through training attempts. The starting stat value + die value = maximum stat at any given time. A training point grants a player a training attempt; if the attempt is successful, the die increases by 1. Die values cannot exceed 6.

Health points (HP) indicate the number of health chips under the Gearloc. The maximum health stat cannot be exceeded, and losing all HP means the Gearloc is knocked out. An HP training attempt will always succeed. Dexterity indicates the maximum number of dice a player can roll during their turn (combination of attack dice, defense dice, and skill dice). Dexterity can alos be spent to move Gearlocs on the battle mat, which then subtracts from the number of dice that may be rolled during the turn. A dexterity training attempt also always succeeds. An attack consists of rolling the designated number of dice (with sword faces!) to deal damage to a Baddie or Tyrant. The attack stat is the maximum number of dice that may be rolled during a turn (and attack dice are not exhausted when used, meaning they can be used turn after turn within the same battle). In battle, each attack die costs 1 dexterity. A single target for the attack must be declared before the dice are rolled. Each sword face rolled deals that much damage (either 1 or 2) to the villain. Each bones face that is rolled may be used in the Backup Plan row and does not decrease the number of attack dice available in future turns. An attack training attempt requires players to roll a number of dice equal to their attack stat. If no bones faces are rolled, the training is successful and the attack stat is increased by 1. If any bones faces are rolled, the training is unsuccessful, but the training point gained from the attempt may be spent on another stat. The defense stat indicates the number of defense dice (with shield faces!) that may be rolled during a turn (and defense dice are not exhausted when used). In battle, each defense die costs 1 dexterity. Each rolled shield face may be placed in the active slots, and the number of shield points in the active slots is the amount of damage prevented. Shield points are then decreased by the amount of damage. Defense dice must be used for all damage (except “true damage,” which bypasses defenses) before HP are reduced. Each bones face rolled may be placed in the Backup Plan row (and doesn’t decrease the number of defense dice available in later turns). For a defense training attempt, players roll a number of dice equal to their defense stat. Any bones faces are re-rolled once. If there are no bones faces after the second roll, the training attempt is successful and the defense stat is increased by 1. If the training attempt is unsuccessful, the defense stat is not changed but the training point gained may be used elsewhere.

Gearlocs also have special skills, labelled as innate on their mat. These skills may be used throughout the game. The innate skill can be upgraded by using 6 dice with bones faces from the Backup Plan row. Upgrades last for the remainder of the game. Once the innate skill is upgraded, the Gearloc’s chip is flipped so the star side is up.

The attack type indicates where on the battle mat the Gearloc will be initially placed and whether/in what manner they will move once placed.

The exhausted dice area on the Gearloc mat is where skills dice are placed once they have been used in battle. Exhausted dice remain exhausted for the remainder of the current battle and become unexhausted once the current battle ends. Baddies may force attack or defense dice to become exhausted, which does decrease the number of such dice available for use in future turns in that battle.

The picture of the Gearloc on the mat is also the prep area. The Gearloc chip will be placed here while not in battle, as will any Buff HP and some skills that are being staged prior to use.

The skills area of the Gearloc mat is a 4×4 grid where dice can be placed. At the beginning of the game, skills the Gearloc starts the game with are placed on the mat and the remainder of the 16 skills dice are kept in their storage tray. Skills are learned through the use of training points. When a skill is trained/unlocked, it is placed in the correct slot of the skill area. The specific die face showing does not matter in most cases, as the die will be rolled when used in battle. Skills can be used once per battle unless otherwise noted. Rolling a skill die does not mean that die must be used. After being used, the skill die is exhausted. Once trained/unlocked, a skill can be used throughout the game. Applying damage to Baddies via a skill die does not constitute an attack. Each face of a skill die has a specific function, and the icon also indicates where on the mat the die should be placed after being rolled (e.g., locked or active). A skill training attempt is always successful.

Each Gearloc possesses collections of skills that group together into a profession, listed in the stat area of the mat. These skills are linked together with lines and/or arrows in the skills area. Skills with a star next to them are always available for training. Other skills, with no star, must be learned in order, reliant on previous skills. There are also some skills, called consumables, that cannot be gained via training and require loot or Backup Plans to unlock. When a consumable die is acquired, that die is placed in the skills area unless instructed otherwise. Once a consumable die is used, it is not exhausted, but instead placed back in the storage tray.

The Backup Skill row can hold up to 5 bone faced dice and can be used to gain skills. Bone faces are “failed” rolls on the various dice. When used to execute a Backup Plan, attack and defense bone faced dice are removed from the row while skill bone faced dice are exhausted. Any bone face dice rolled by the player can be placed in the Backup Plan row. Dice are placed and used in order from left to right/ Bone faced dice remain in the Backup Plan until used, or at the end of a battle, or if the Gearloc is knocked out. To upgrade the innate skill, a 6th bone face will temporarily be placed in the Backup Plan row next to the 5th slot.

In the active slots, players place the defense and skill dice they roll. Active dice remain in those slots until used, or until the end of the battle, or the Gearloc is knocked out. Skill dice in the active slots are exhausted when used unless otherwise noted. In the locked slots, locked skill dice are placed, and remain in the locked slots from battle to battle until used or if a Gearloc is knocked out. Skill dice from these slots are exhausted when used.

Finally, the Loot area of the Gearloc mat is where players place loot or Trove Loot that their Gearloc has gained. Gearlocs can hold up to 4 pieces of (Trove) Loot. Locked Trove Loot always takes 1 space, while unlocked Trove Loot and regular Loot may take up more than 1 space.

Baddies are the workhorse opposition encountered during the game. Baddies are represented by chips, which contain a variety of information: a) HP; b) initiative (their starting position in the initiative meter on the battle mat during a battle); c) attack style (ranged or melee); e) number of defense dice they roll; f) number of attack dice they roll; g) skills; h) Backup Plan skills (used if the Baddie rolls at least 1 bone face); i) which Gearloc is targeted in case multiple Gearlocs are equidistant from melee Baddies or the type of target for ranged Baddies (either the strongest or weakest applicable Gearloc); j) whether the Baddie draws additional 5 point Baddies into the battle queue; k) whether the Baddie can move diagonally and, on the back of the chip; l) the point value of the Baddie.

Beating the chosen Tyrant is the ultimate goal of the game. Tyrants have both a card and a chip (that operates like a regular Baddie during the final battle). Tyrant cards provide information about what types of Baddies are used in that particular game, the number of progress points needed to challenge the Tyrant, and the day number by which the Tyrant needs to be defeated. The Tyrant card also serves as the Encounter card for the day in which you challenge the Tyrant. A failed tyrant battle functions as a failed Encounter battle, but can be tried again if there are days left to do so. Some tyrants also have a special die that is rolled alongside the attack and defense dice. There are also additional Tyrant Encounter cards that get shuffled into the Encounter deck.

Battles occur on the battle mat. Like the Gearloc mat, the battle mat has a few different areas. The initiative meter tracks the round of battle (using the round-counter die) and the order in which Gearlocs and Baddies take turns. After Round 5, all actors on the battle mat lose 1 HP at the start of each round (this damage cannot be defended against). Baddie chips reveal their initiative level, which is represented in the initiative meter by the die corresponding to the lane number of the Baddie. There are 4 lanes total, each with spots for ranged and melee Baddies. Baddie and Gearloc order is determined in descending order, with the highest initiative levels going earlier in the round. Players roll their Gearloc’s initiative die and place them in order in the initiative meter. When Gearlocs are involved in a tie, players decide what specific turn order each involved actor will go in. If Baddies are tied, they are placed in order of Lane number (e.g., a 6 Initiative Lane 1 Baddie is placed above a 6 initiative Lane 2 Baddie). After the first round of battle, the starting initiative placements may no longer be relevant, as skills can modify the order of dice in the initiative meter. Actors who enter the battle mat after the first round always begin in the first or last position of the initiative meter. All late-coming Gearlocs, Tyrants, and 20 point Baddies enter at the top of the meter, with their specific initiative value disregarded. All late-coming 1 and 5 point Baddies enter in the bottom position. Actors whose initiatives were changed during the round will change places only after the round ends.

The battle mat has 8 colors circles where Baddies are placed: 2 spots per lane, for attack styles of ranged and melee. Lanes are filled in ascending number order (lane 1 is not the left-most lane). The chip for the lane number a Baddie enters on is placed under the Baddie, as they may change lanes during battle. There are also 8 grey circles where Gearlocs are placed based on their attack style. Gearlocs can be placed in any lane with up to 2 Gearlocs per lane.

Unless otherwise noted, actors can only move to orthogonally adjacent spaces, and cannot move through spaces with other actors or be in the same space as another actor.

To set up a battle, a battle queue populated with Baddies is created. Baddies are taken from the active stacks (stacks of appropriately typed Baddies). Except for any Baddies that have been revealed and are face up through scouting during the recovery phase, the battle queue is created face down. Higher value Baddies are placed on top of lower value Baddies. Encounter cards specify the number of Baddie points players will need to encounter, and is often equal to the number of Gearlocs multiplied by the day number. Baddies are selected so that the highest possible value Baddies are used (e.g., for 26 Baddie points, a 20 point Baddie, a 5 point Baddie, and a 1 point Baddie are used, rather than other combinations like five 5 point Baddies and a 1 point Baddie).

Before building the battle queue, “before battle” effects and skills are triggered. After building the queue, populating the battle mat, and setting the initiative meter, “start of battle” effects and skills are triggered. During battle, if there are more than 4 Baddies in the queue, later Baddies are placed in the lane of the Baddie that has just been defeated and removed from the mat.

In battle, Gearlocs proceed as follows: each turn, if a melee Gearloc wants to move, it uses x dexterity to move orthogonally x spaces and attacks an adjacent Baddie. Ranged Gearlocs can spend x dexterity to move orthogonally x spaces and target a Baddie anywhere on the mat. There are no line of sight requirements. Unless otherwise noted, Loot can be used at any point during a Gearloc’s turn. To start their battle turn, a player triggers an effect dice that have been placed on top of their Gearloc chip. Then the Gearloc moves. After moving, a target Baddie is chosen for battle. The player then chooses which and how many dice to roll, rolls all dice simultaneously, and resolves the roll by performing the following actions in any order: a) resolve target damage and effects; b) resolve non-target damage and effects; c) allocate active, locked, and Backup Plan dice; and d) use Backup Plan dice. After the dice have been resolved, any Baddie skills that have been triggered are performed. After this, the Gearloc’s turn is over.

For Baddies, skills will trigger at specific times during the battle, depending on the skill. Ranged Baddies do not move and can attack any Gearloc, regardless of location. Melee Baddies can move orthogonally up to 2 places per turn, always toward the closest Gearloc. If 2 Gearlocs are equidistant, the Baddie chip indicates whether the Baddie will move toward the strongest or weakest Gearloc. To start a Baddie’s battle turn, start of turn effects trigger and any applicable dice on the Baddie chip are resolved. The target is determined, at which point the Baddie moves. Any skills without specified times trigger, and then the Baddie’s attack and inactive defense dice are rolled. The dice are resolved, starting with defense, then attack, then bone faces, then lastly the Tyrant die. The Gearlocs react, and the Baddie’s turn is over.

If a Gearloc is knocked out, the Gearloc’s chip and initiative die are removed from the battle mat and placed in the prep area of their Gearloc mat. All dice in the active slots, locked slots, and Backup Plan are removed, with the skills dice becoming exhausted. Loot remains, but is unusable while unconscious. If all Gearlocs are knocked out, the battle immediately ends, and players proceed to the recovery phase for the day. After an unsuccessful battle, any undefeated Baddies are placed facedown at the bottom of their respective active stacks.

If a battle is successful (ends with at least 1 conscious Gearloc), all dice from all Gearloc’s active slots and Backup Plan row are removed. Locked dice can stay. All exhausted skill dice are placed back in the skill area of the Gearloc mat. Any Buff HP are removed. All Gearlocs, with their stack of remaining HP, are moved to the prep area of their mats. Players proceed to the reward phase of the day.

After successful battles, players will likely receive Loot and perhaps also Trove Loot. Trove Loot will need to be lockpicked to be usable. There are 4 lockpicking dice, and each Gearloc will have one attempt per day during the recovery phase to pick the lock on Trove Loot. Partially unlocked Trove Loot will remain so, giving players a jump start on the next turn.

The difficulty of the game can be adjusted by manipulating Gearlocs’ HP stat, training points, and knockout effects as specified in the rule book.

Color commentary: I may have done this to myself somewhat by buying everything associated with the game and then mixing everything together (which is fine, in theory, because everything is compatible) before trying the base game by itself before adding more components. That said, I ended up playing with at least one Gearloc that was not included in the base game, and had to be bought separately as an expansion, and that was the Gearloc I liked best, so maybe it was a wash.

In the first game, my Gearloc was Nugget and the Tyrant was Kolossum. I lost, pretty badly. I succeeded on the first 3 special Encounters, which seem to be meant to gently ease you into the game, and earned 4 of the necessary 5 progress points that way. But then I lost every encounter after that.

I think I did a lot of things incorrectly, though I also lost track of what those things might have been. I had to keep referring to the rule book and reference guides (both for the Gearloc and the general reference guide) to figure out what specific symbols means, or what a particular Baddie skill meant. Not having anything feel intuitive was frustrating, and while the Baddie skills and flow of combat might be easier to remember with repeated plays, having to look everything up discourages me from playing again because I’m spending so much time away from the actual game trying to figure out how to play the game.

Per previous habits, it was really hard for me to remember to adjust the counters, especially the round-counter during battles, which was especially bad because some Encounters require actions during particular combat rounds. And I’m not sure hot to make myself better at this, honestly, since it’s been a perennial problem.

The battle lanes not being in numerical order from left to right was hard for me to get used to, and it’s not clear why they couldn’t be, since everything was pretty much determined by initiative, anyway. It was just one more thing that didn’t feel intuitive. I also struggled with the initiative thing, and keeping track of who was taking a turn when, but some of that is probably just lack of experience with traditional RPGs like D&D, where these things are routine. If only I had been cool enough to plan D&D in my youth!

My tl;dr first game impression is that I did a lot of things wrong. In combat that may or may not have hurt me, I honestly don’t know. There’s an overwhelming amount of stuff to keep track of and I never felt like the game flowed from one action to the next – there was always something to look up or check or verify. Also, if you’ve been losing encounters in the early days of the game, you’re pretty much doomed during later days, since you’re missing out on training attempts and Loot that you would acquire through victories, which is basically what happened to me. It seems like once you lose an Encounter you’re pretty much doomed because you’re facing increasing numbers and/or strength Baddies without any prior gains to help boost your chances.

It was hard for me to know what to train for and in what order, because a lot of the skills seemed generally useless. Granted, this was also mostly moot because I kept losing encounters, and so didn’t get to train/unlock much of anything. But I also honestly don’t know what I should have focused on if I had been given the opportunity – attack, defense, or skills, and if skills, which ones?

For the second game, I made myself a one-sided reference sheet that had all the Baddie effect information, plus reminders about battle turn orders, and the flow of the game in general. That helped a lot, and even though I had to hold the sheet close to my face because it was in 6-8 point font, knowing where all the information was on the sheet was really helpful, and I didn’t have to keep flipping it over and back to try to find what I was looking for. So the reference sheet was a success. I didn’t really like the Gearloc I used in the first game, so I tried Duster in this one, but kept Kollosum as the Tyrant because he was designed for a relatively short game, which is nice while I try to get the hang of things. Duster was nice because she seemed to have more combat-useful skills, plus a companion wolf who could fight Baddies, which was a much needed and appreciated boost in battle. I also definitely messed up using dexterity points to move, although in my defense Baddies largely came to me without my having to really seek them out. I also feel like I might have forgotten to implement a couple Baddie skills because I was piling them high with defense dice, though I’m also thinking they just would have maintained their single defense die if they didn’t need it, rather than rolling a new one each time. So that mistake definitely made things harder on me, because they were up to like 7 points of defense or whatever and were thus basically untouchable except through a skill that I rolled really lucky on that dealt them True Damage each turn, which they couldn’t defend against. So I think I won this game, which did make it more enjoyable, though I still made some mistakes. And even though it was more fun, still having to constantly reference what Gearloc dice icons meant and what Baddie skills did still made things feel tedious. The other parts of the game (Encounter, battle, reward, recovery cycle) required less referencing this time. Perhaps the key is to always play with the same Gearloc (and maybe Tyrant) until you can remember what everything means without having to check? But with 16 skills dice per Gearloc, it seems like it would require a lot of regular playing to get everything to stick. And that would also take away from some of the excitement and enjoyment that variety usually brings.

Since I bought basically everything for the game, I have a material interest in enjoying the game, and I think I’m going to play it a few more times before making a final judgment, but I will say that I wasn’t immediately dazzled by the game the way a lot of reviewers seem to have been. I don’t know if I’m not a sophisticated enough gamer or what, but the times that felt like a grind seemed to vastly outnumber the times that felt like I had a handle on what was happening and I was able to develop a rhythm.

Thoughts M might have had if he had played: The components of this game are fantastic: approximately 9 million dice and weighted poker-style chips that you get to stack together. The actual game, though is not just too many bones, it’s too many everything. Too many different dice faces with non-intuitive symbols to keep track of. With all the expansions, too many Baddie chips to sort through to identify the correct ones, too many Tyrants to choose from, too many possible Encounters. Just. Too. Much. I can’t really envision myself playing this game based on the description here and the brief moments I was able to watch Petra playing. Not that I’m inclined to play solo games anyway, but I would definitely not play this one solo, as I think it would be too overwhelming to try to track everything. I suppose if Petra promised to be what amounted to a game manager and make sure everything proceeded in an orderly fashion, I might enjoy choosing which combinations of dice to use to try to optimize my attacks and defense, but it would be because she really wanted me to, and not because I really wanted to.

Petra rating: 6/10
M rating: 2/10

Black Sonata (TGG Games, 2017)

Basic details: 1 player; 30 minutes; beat-your-own-score solo mode

Date played: May 20, 2021

Gist of the game: In this game, you are tracking Shakespeare’s elusive muse that he dubbed the Dark Lady, and whose identity remains unknown, through London. You move throughout the city, searching locations for the Dark Lady. Once you think you have determined her defining characteristics, you must find her once more to verify you are correct.

There are a few different decks of cards used in this game. To begin the game, place the board in the middle of the play area and place the pawn at any location. The deduction tokens, with which you will build your profile of the Dark Lady’s characteristics, are placed by the board. The small deck of fog cards is shuffled and placed face down next to the board.

Next, assign the Dark Lady. To do this, shuffle the clue cards (featuring, on the face-up side, a picture of a woman, her name, her 3 (out of 7 possible) characteristics, and how many of her characteristics match the Dark Lady based on the suit of the Dark Lady, and, on the face-down side, a suit. There are 6 total suits and 2 clue cards per suit). Draw the top card (face down) from this deck and tuck it under the appropriate spot on the board. The clue card with the same suit as the Dark Lady is placed face down near the board with the location cards placed on top. Once you have received all the location cards by visiting all the locations on the board, this clue can be revealed to you. Clue cards may also be removed from the game in order to adjust the difficulty. The clue cards that remain form the clue deck. The clue cards are shuffled again and placed face up with the mask card placed on top, keeping the top clue card hidden.

For the Dark Lady’s stealth deck, choose one of the 8 letters displayed (top row for easier games, bottom row for harder games), and note its position (e.g., top leftmost, bottom 2nd from the right, etc.). For that position, you will then assemble the stealth cards alphabetically, discarding any that only have a dash for that location. Once the cards have been alphabetized for the position you have chosen, turn the cards face down so they display the location symbol and then cut (not shuffle) the deck at least once, but as many times as you wish. Then take the countdown card so that the number 2 is displayed right side up and place the card on the bottom of the stealth deck. Each time you pass through the deck you will lower the counter by 1, and you lose the game if you reveal the counter with 0 displayed.

During the game, you and the Dark Lady will take turns moving. The Dark Lady always moves first. Each of you can only move to locations adjacent to your current location. There are tokens for you to use to identify the Dark Lady’s possible positions. Each round, to move the Dark Lady, the top stealth card (i.e., the previous turn’s move) is moved to the bottom of the deck and the Lady moves to the revealed location(s).

On your turn, you can take one of the following actions: 1) move the pawn to an adjacent location; 2) search for the Dark Lady at your current location (either for a clue card or to reveal if your deductions are correct); 3) use a fog action card; or 4) take no action and move immediately to the Dark Lady’s next turn.

When you move the pawn, you may only move it to an adjacent location. If you have never been to that location, you receive the location card with a keyhole punched out for use when searching for the Dark Lady. Once you have received all the location cards, you can also reveal the clue card the location cards were previously covering.

To search for the Dark Lady, replace the current stealth card with a fog card. To do this, slide the fog card underneath the current stealth card without revealing the next stealth card (which reveals where the Lady will move next). If the current stealth card is already a fog card, you cannot perform a search. If there are no fog cards left for you to place in the stealth deck, you lose the game. Then, with fog card safely underneath, take the current stealth card and place it so that the location symbol faces you and the other side of the stealth card covers up the location/name on the location card (there is a quote on the other side of the location cards). Then, turn over these two cards so that you can see the Shakespeare quote and part of the stealth card through the keyhole. If the Dark Lady’s silhouette is visible in the keyhole, you can take the top card of the clue deck and reveal it. If you have enough clues to make your guess as to the identity of the Dark Lady, you can also check your guess once you’ve found her. If there is no silhouette, the Dark Lady is not at that location. Either way, discard that stealth card from the game and have the lady flee by advancing the stealth card a number of cards equal to the number of clue cards that have been revealed.

When encountering a fog card in the stealth deck, the lady will continue on her path, but you cannot search for her this turn (her whereabouts are a mystery). To use the fog card’s action, replace it with the top card of the fog deck (placing it underneath the current fog card without revealing the symbol on the next stealth card). and turn the current fog card over to reveal its action. Take the action and then, if applicable, place the card at the bottom of the fog deck. If you cannot take the action on the fog card, or you cannot replace the fog card with another fog card, you lose the game.

So, ways to lose: Run out of fog cards or be unable to take the action on a fog card. Or go through the stealth deck 3 times. Or be incorrect about any of her characteristics when you make your official guess.

If you successfully identify the lady after successfully searching for her, you can also tally your score. You earn 1 point for each card in the stealth deck on top of the countdown card. Multiply the number on the countdown card by the number of cards in the overall sequence (26 in a regular game). Add 2 points for each remaining card in the fog deck. Then make adjustments based on the difficulty of the game. Halve your score if you’re playing in training mode. Subtract 30 points if you played on easy mode. Add 5 points if you played on advanced mode. Add 5 points per discarded fog card in expert mode. This score then fits in a threshold with a Shakespearean theme: chimney sweeper, golden lad/girl, fair youth/maid, and immortal bard.

Color commentary: Oh, lawd. Why do I find myself drawn in concept to deduction games, when in practice I have the deductive skills of a peanut? (M here: Don’t sell yourself short. You are easily on the level of an almond.)

Also, I found the rules to be mostly incomprehensible. I don’t know if this is because they are actually mostly incomprehensible, or if I was just struggling to conceptualize things, but I had to resort to YouTube videos to figure out how to play, which is my very least favorite way to learn how to play games. It really bothers me when I can’t figure out how to play a game using just the rulebook. My worklife is basically spent making sense of oblique writing and it feels like a blow to my intellect when I can’t do the same in my hobby. This is only the 2nd game (Bottom of the 9th being the other) I’ve had to resort to YouTube for, though, so I suppose I should give myself a bit of a break. And the videos did make it much more clear, which I suppose is the important thing, but the lingering self-doubt from having to rely on them in the first place persists.

I was roughly as bad at the game as I expected to be. On both my playthroughs, I had a spate of unlucky searches and ran out of fog cards. On the first game, I had correctly determined 2/3 of the characteristics, and then did worse in the second game, only getting 1 characteristic correct. Nonetheless, it feels like a faster game than Sherlock Holmes Consulting Detective, and losing felt less embarrassing for some reason I can’t quite identify.

Thoughts M might have had if he had played/after reading my description: Boring theme. (Petra here: M’s too old to have grown up with Wishbone, so he never developed the taste for literature that I have. Sad, really, though forgivable.) The keyholes in the location cards are pretty neat, as is how they align with the stealth cards to know if your guess is correct. Overall, the game seem complicated and like I wouldn’t enjoy it very much. Then again, the process of deduction and trying to triangulate the Dark Lady’s characteristics seems like it could be interesting. Maybe I’ll join up as the other half of Team Hendriquist for a game sometime. In the meantime, I’m holding out for what Petra says is a Space Invaders-esque solo game that she’ll bust out and write about at some point this summer.

P rating: 6 (mostly because I’m finding it hard to imagine ever winning, which does make a game somewhat less appealing, especially when I’m the only player)
M rating (based on premise and description): 5

Gunkimono (Renegade Game Studios, 2018)

Basic details: 2-5 players; 45-60 minutes; competitive

Dates played: May 15-May 16, 2021

Gist of the game: You are a daimyo in feudal Japan, seeking to build your strength and expand your troops. This may involve battle with opposing daimyo, and only one can be the most powerful.

To begin the game, the game board, with various areas, is placed in the middle of the table. The war banner tiles are placed in stacks across the appropriate row of the honor track (varies by number of players). Players choose the color of their choice and receive the daimyo tile, daimyo meeple, honor markers, and strongholds in that color. The honor markers are placed in the bottom row of the honor track and the stronghold markers are placed in the appropriate place on the honor track (also varies by number of players).

The large army tiles are shuffled and distributed across several face-down stacks. The exact number of tiles varies by player count. For a 2-player game, we left 20 tiles in the box. The top 5 large army tiles from the stacks are shuffled in with the end of game tile, covered with the cover tile, and placed off to the side. Three large army tiles are drawn and placed face-up next to the stacks of tiles. Each player is dealt 3 large tiles from the stacks and given 5 small army tiles (one of each color).

On their turn, players take 4 actions: place an army tile, score points, assess strongholds, and refill hand.

To place troops, players place a large army tile face-up on to of other troops on the battle field, creating stacks of various heights over the course of the game. Players may not cover troops of the same color with either half of their tile, and the tile must be placed so that it lays flat on 1 level. If a player wants to place it such that it would be 2 levels, they must first place a small army tile face-down on top of the lower level to raise it up. Only 1 small tile may be placed per turn.

After placing their tile, players score their choice of victory points or honor points for each half of the large tile. To score victory points, the player scores 1 point for each contiguous tile of the same color (including the placed tile itself). (Note: absolutely did this incorrectly. I’m not sure if it would have changed the outcome of the games, but the scores would have been crazy high). To score honor points, the player scores a number of points equal to the number of stronghold symbols on that half of the tile (note: we took victory points based on stronghold symbols as well. Oops.). When scoring honor points, the player identifies the column of the honor track of the same troop type (color) and moves the honor marker upward one space for each point scored.

Once all 5 of a player’s honor markers have reached or passed the row with the lowest remaining stronghold, they build that stronghold (but only 1 stronghold per turn). They then place the stronghold on the troop of their choice on the board so long as the formation (orthogonally adjacent groups of the same color) does not already have a stronghold on it. That formation is now under the player’s control. Once a stronghold is built, the following rules apply: an army tile may not be placed where the stronghold is; victory points cannot be earned for joining a formation with a stronghold; tiles can be placed so that they split up formations, but not so that they join formations controlled by different players.

If a player’s honor marker passes the top threshold, they claim the topmost tile in that column, placing it facedown in front of them (they can look at it, but not reveal the point value). This tile will be scored at the end of the game. Once a player claims a banner, they remove that honor marker from the game and can no longer score honor points of that color.

The third action in a turn is to assess the strongholds, scoring victory points for each troop in the stronghold’s formation, even if the stronghold was built during that turn.

If a player played a large army tile in a turn, they draw a new one from one of the face-up options or from one of the face-down deck. If they take a face-up tile, they replace it from one of the face-down decks. As soon as a player has drawn the last army tile from the primary stacks, the end-of-game stack is brought from the reserve. When the game end tile is drawn, the remaining players complete that turn, and the game ends. Players reveal their war banners and add these victory points to their total. The player with the most victory points wins.

Color commentary: I think I explained this game fairly well, aside from botching the victory points for tile placement, and how does M repay my competent teaching? He trounces me 4-1 in a 5-game series. I feel like my ability to teach a game presents a moral hazard. I should strive to explain the game well, but doing so makes it easier for M to understand, which then makes it possible and indeed possibly easier for him to beat me. Repeatedly. Sometimes in a fashion that the final scores aren’t even close. In seriousness, I struggle to explain games well (they make sense in my head, but translating that into sensical explanations remains an elusive skill), and we played a practice game before the official series started that did not end well for M. We talked strategy throughout that game and recapped various points in the rules, and he was off and running, scoring more than 200 points in one game. And this was with us scoring tile-placement victory points in a way that probably reduced the overall number of points we scored!

It seems to me that perhaps the biggest key to success is to gain the strongholds first. This might end up mattering less if you’re actually taking victory points for placing tiles into formations earlier, but it was crucial with how we ended up scoring the game. I gained the first stronghold first in the game I won, and M was the first to gain a stronghold in each of the subsequent games, all of which he won. Of course, I was trying to gain the strongholds quickly and failed to do so, some of which is luck, based on the tiles you’re dealt in your initial hand and that become available throughout the game.

The variable endpoint once you get to the last set of tiles is interesting and ratchets up the end of game tension, as each person tries to maximize their final moves without knowing exactly which move will be the final-final move.

This game makes two different play styles possible: one in which players mostly do their own thing, or one in which players actively interfere in each other’s formations and try to thwart progress. With two players both are possible, and I prefer the former style, but thwarting seems like it would be impossible to avoid with more than 2 players.

Thoughts from M: I didn’t understand much of the game’s dynamics in the practice game, and I chose a strategy of trying to slowly earn honor points, while getting victory points simultaneously. That turned out to be a terrible strategy. In subsequent games, the best strategy seemed to be reaping as many honor points as possible early on to get the strongholds, which can give you a sizeable number of victory points each turn. Of course, I did this without realizing we were scoring victory points incorrectly, and with that in mind there’s probably a balancing act, since you can also give large numbers of points for contiguous tiles without a stronghold.

I also struggle with games where there are multiple goals (honor points, victory points, formation size, possible thwarting), and it took a little while to get the hang of this game. I possible also abused the non-thwarting pact a little by trying to race lengthwise across the board to seriously hem in where Petra could expand her formations. I wasn’t doing this to consciously place rather severe limitations on where she could place tiles, but I must be innately evil, with such vile maneuvers simply coming naturally (M here: Petra offered to type up my notes for me and now I see why. It wasn’t conscious, and I didn’t even realize I had been doing it until we were talking through why she kept losing badly after we finished the series, and then I apologized, because I am, in fact, not innately evil. Or maybe I am. Maybe I am as evil as Cher’s rival in Clueless. You know who I am talking about, right? The one with the nose job. She wasn’t really an important…) (Petra here: hmph).

The stacking adds an interesting dimension since you can only add one boosted tile per turn, so you might have to think further about placing boosters.

I think the key is to quickly identify two colors and build proto-strongholds based on them while also concentrating on playing enough of a variety of colors to be able to earn the strongholds quickly.

I think that perhaps the most important aspect of this game, though, is that Petra bought thick, fancy poker-style chips to use to keep track of points, and they are amazing. I’m happy I scored so many points if for no other reason than it gave me the chance to interact with the chips more. They’re delightfully tactile and just pleasant to use. Honestly, the chips may have been the best feature of the game, and I’m thinking that other games with score tracks will be made much more enjoyable by using these instead. Carcassonne, for instance, just got a lot more appealing. And Dominion? Sure, you could just add up the points listed on the cards, but how much more fun would it be to convert them all to chips and count them that way? MUCH more fun, let me assure you.

Petra rating: 9
M rating: 8/9 (up from a 7 after the first real game)

Orchard: 9 Card Solitaire Game (Side Room Games, 2019)

Basic details: 1 player; 10 minutes; beat your own score solo mode

Date played: May 2, 2021 (like 8 rounds)

Gist of the game: You are a fruit tree grower planning your orchard and trying to maximize your harvest.

To set up the game, the player sets the dice and rotten fruit tokens off to the side and shuffles the 18 cards, drawing 9 of them to form the game’s deck and setting aside the remaining cards (for the next game’s deck). The player places 1 card in the center of the table and draws 2 cards as a starting hand.

On each turn, the player plays a card such that a tree on this new card overlaps one or more matching trees on card(s) already in play. If this is the first overlap, a matching die with the 1 pip up is placed on the tree. If it is the second overlap, the die is changed to the 3 face, 6 face on the third overlap, and the 10 face on the fourth overlap. If a tree is placed on a non-matching tree, a rotten fruit token is placed on the tree instead, and cannot be overlapped and replaced by any new trees. Rotten fruit tokens can be placed up to twice per game. To end the turn, the player draws another card from the deck to bring their hand back up to 2. The game ends when the player runs out of cards or cannot legally place a card.

To score, the face values of the dice are added and 3 points are subtracted for each rotten fruit. The scoring thresholds are fruit/tree puns.

Color commentary: Although technically a solo game, we played collaboratively as Team Hendriquist. I like that it can be collaborative. I meant to play it this week while I’m taking a day or two to recover from the semester before I have to get my online summer class up and ready to go, but the box caught M’s eye and it turned into a fun afternoon, just blasting out game after game. Being able to play twice in rapid succession was also nice, because sometimes resetting a game can get tedious.

I really like how puzzely this game is, and how much thinking is involved to try to make the optimal choices. I like puzzles, and I like trying to muddle through what the best choices are when none of them seem great.

This is also a fun game when you want to play something but don’t necessarily have a lot of time or energy, or even space. It’s compact both in its box and when it’s on the table, and the rules are easy enough that you can play when tired, although it will certainly be harder to play well under those conditions.

I feel like this sounds like a faint praise set of comments, but I really, really like this game, and I want to see if I can get my mom to play it, because she likes solitaire, but not really playing board games by herself, and I think this could be an interesting intersection. I feel like any time I have to travel by myself in the future, I may take this game with me.

Our scores and rating for the first 4 games:
23: Pal-tree
29: Forget-apple
36: Remark-apple
26: Satisfac-tree

Thoughts from M: This involves special recognition, so I struggled with it, but I liked it a lot. I usually like to play a game a couple of times before deciding how I feel about it, but this game had me hooked from the beginning. This is the best new game I’ve played in a while. Overall, slightly behind King of Tokyo, just because King of Tokyo is basically perfection, but definitely on par with some of my other favorite games, like Unmatched and Revolver 2.

Petra rating: 9/10

M rating: 9/10

Open Ocean (Featherstone Games, 2020)

Basic details: 1-5 players; 30 minutes; competitive; beat your own score solo mode

Dates played: April 29, 2021; May 2, 2021

Gist of the game: You are a marine biologist and reef expert trying to repopulate parts of the ocean (I’m making this up, because I don’t remember any cutesy intro from the game. There might have been one, but I forgot to paraphrase it in my notes, and now the game is put away and I’m on the couch so here we are). In an effort to build up the healthy reefs, you strategically place coral and at times, creatures, into the reef in the hopes that these organisms will, in turn, attract more life to the reef until it is thriving again. The player to do this most successfully, with the largest number of points, wins the game.

The setup for 2 players is in a different area in the instruction manual, but I can’t find a difference between the two sets of rules, so let’s say this covers how to play a 2+ player game.

To set up the game, each player is given a starter coral. Any habitat bonuses, event cards, and variant cards not being used are removed from the game and all remaining cards are shuffled and placed as a deck. Each player receives 6 cards from the deck as their starting hand. 8 cards are placed face-up around the deck to form the ocean (in the 4 orthogonal and the 4 diagonal locations adjacent to the deck).

The ocean will always have 8 cards in it. Any card taken from the ocean is immediately replaced with a new card from the deck. If the ocean ever has no fish cards, all cards in the ocean are discarded and the ocean is replenished with 8 new cards. If the ocean ever has 3 sharks in it, they trigger a feeding frenzy, and players lose their highest scoring unprotected fish from their reef and then the ocean is refreshed (discarded and replaced). Players try to attract cards from the ocean to their personal reef using the cards from their hand. Attracted cards must connect to the card that attracted it.

The game is played over 3 rounds, with each round having 5 turns. Each turn as three phases: players pick a card from their hand and place it face-down in front of them. When all players have chosen their card, in turn order they reveal and play the card onto their reef, resolving any accompanying action. Third, after all players have played their card, players pass their hand to the player on their left. Players take their new hands and the new turn begins. When players are left with only 1 card in hand, they discard this last card and the round ends. The ocean is refreshed and players receive a new hand of 6 cards.

Cards indicate their placement rule, their point value, and their action. There are 2 placement rules. Some cards can be placed diagonally adjacent while others must be placed orthogonally adjacent to another card. Actions include attracting fish of various size to a player’s reef; exchanging a dolphin card for a fish card from another player’s reef and immediately playing it; swapping a shark card for one fish card in the ocean, immediately playing it; and refreshing the ocean, taking one of the new cards and immediately playing it, connecting the sea turtle to this new card.

Cards cannot be played below the starter coral, which forms the bottom row of the reef. Coral and anemones must connect to each other, but can do so diagonally. There can be no random, free floating coral or anemone. Anemone cards protect the 8 surrounding cards from being removed from the reef. Little fish are played surrounding a coral or anemone card or next to a matching little fish card (to form a school). Medium fish must be placed next to a small fish or a matching medium fish (to form a school). Large fish must be placed next to a medium fish or a matching large fish (to form a school).

At the end of the third round, the game ends and the reefs are scored.

Points are given for the following: a) the total number of points displayed on the cards in the reef; b) 1 additional point for every fish card in a school; c) increasing numbers of bonus points for having several colors of coral in the reef; d) any bonus cards being used.

Color commentary: The only thing I’m not really sure if we’re doing correctly is that we’re playing using chain creation. That is, let’s say I play a reef card. Then I attract a small fish from the ocean, which in turn attracts a medium fish from the ocean, which in turn attracts a large fish from the ocean. Is that right, or do you stop with the small fish? Not entirely clear, but the chains make the most sense, I think, so that’s what we’ve been going with, and I think it works fine, though the game does end up super sprawling and too large for our 3x4ish table.

In addition to the special cards identified above (dolphin, shark, and sea turtle), there are also crabs, but they are not explained anywhere in the instruction manual so far as I can tell, and their action symbol seems to be a combination of two existing actions in a way that does not make sense to me.

Overall, this is a fun game with two main strategies so far as I can tell: go for schools (preferably of 3 point fish), or go for 1-2-3 chains (assuming this is the correct way to play) without neglecting the coral which, if you can play a variety of colors, can earn you a rather substantial number of points but also keep you with placement options in case bigger fish for chains are not available. M followed the first strategy in our first game, (M here; my strategy was schools in the first in the first game and chains in the second. The problem is that the cards rarely went my way in the second and so I can see why it might not have been clear.) I followed the second, and won by 1 point. In our second game, I’m not sure what his strategy was, because he says he forgot about the school bonus, but he was playing a lot more coral cards, and beat me by 1 point. I was still trying for the 1-2-3 chains and corals, but paid a little more attention to schools, especially as the ocean was less cooperative and accommodating in the second game. So both games were close and the strategies seem viable and at least a bit dependent on the luck of the draw on the ocean

Thoughts from M: Now I don’t know where you were born, but if you’re like me and grew up on the Artic Northwestern side of Southeast St. Louis, we had a name for games like this and it was Not Monopoly (Petra here: that is absolutely not where M is from. He was also dictating this to me in an overloud horrendous faux-Southern accent) (M asserting myself here: I just get fightin’ mad when I read these words. I try to respect e’ryone, and I’m feelin’ mighty disrespected right now. Also I did not dictate these words. I’ve learned my letters). We called games like this Not Monopoly because they were not Monopoly. It was an apt description back then and it remains so today.

This was a fun game with good but not great graphics (box art excepting). I will have to think about it and/or play it some more to figure out which strategy is most likely to be successful more often. I didn’t realize until the second game that you could build reefs diagonally (Petra here: oops. Probably bad explanation on my part. What can I say? It’s not like I’m a professional teacher whose job it is to explain complicated things to people in ways they can understand…), which is interesting and adds a new wrinkle because you have a lot more directions you can build your reef from and let your reef grow. Playing this on a bigger table would be really interesting because you could let your reef branch out basically however you wanted, rather than having to be mindful of whether or not Petra would be physically able to place a card somewhere. It was also sometimes hard telling our reefs apart because there was definitely some intermingling, but that’s a logistical issue that can be fairly easily addressed by playing elsewhere.

Petra rating: 7/10

M rating: 7/10

Wooly Wars (Lui-Meme, 2002)

Basic details: 2-4 players; 30 minutes; competitive

Date played: April 29, 2021

Gist of the game: Players take on the role of shepherd, placing tiles to create villages, forests, and safe pens for their sheep. The player with the largest safe enclosure at the end of the game wins.

To begin the game, the village fountain is placed in the middle of the table. Each player randomly receives a question mark tile without the color being revealed to anyone. Once the player has the tile, they may look at their designated color, but this information should not be shared with any other player. Each player then draws a hand of 4 double-sided landscape tiles.

On the first turn, the first player places a tile with a village edge next to the village fountain and then draws one tile back into their hand. If they do not have a tile with a village edge, they do not take a turn and play passes to the next player. Tiles must orthogonally match the tiles they are being placed next to, so that only sheep are placed only next to like-colored sheep, woods are placed next to woods, etc.) On future turns, players take a number of tiles equal to the number of adjacent edges they match with their tile (i.e., if a tile borders 1 tile, the player takes 1 replacement tile; if they place a tile touching 2 other tiles, they draw 2 replacement tiles; etc.).

At any point in the game, a player may choose to reveal their secret color. They then place their question mark tile sheep side up on the table and draws new tiles accordingly. Also at any point in the game, players may announce that they are placing a wolf and/or a hunter. They announce the number and type and play them in that order. Wolves are placed in wooded areas and threaten sheep until a hunter tile is placed on top of them, negating their effect. Hunters may also be placed in the woods preemptively, to protect against wolves.

When there are no more tiles available to draw, players continue placing tiles until they can no longer do so or they choose to stop. The first 3 players who, during their turn, opt to place no more tiles receive bonus points for their tactical decision. When all players are done placing tiles, the game ends. Players score 1 point for each sheep in the biggest enclosed field of their color that is not being menaced by a wolf. The player with the highest score wins.

Color commentary: This is like Carcassonne with sheep and a twist, and I love it. Tile-laying, color-matching, and adorable animals in sweaters. That checks three boxes right there.

We made the game semi-cooperative by trading tiles a couple of times, including me trading away a hunter that was ultimately my downfall, as it allowed M to play the only tile left that could have closed his pen (and that also happened to have a hunter on its opposite side) while also having the opportunity to neutralize a wolf I may or may not have previously placed there to menace his sheep.

There’s an interesting strategy trade-off between building your own pen and trying to interfere with someone else’s probable pen, especially before you know their color. The wolves also add a take-that element beyond closing off other players’ pens, as the wolves have the potential to completely negate even the largest pen if there’s no hunter to keep them at bay.

The double-sided tiles also make it interesting and add more choices, and I find myself wishing that Carcassonne had double-sided tiles. I didn’t realize that there was something that could make Carcassonne more perfect, but if there’s anything, it would be this. It just creates more possible combinations and keeps the game more dynamic.

Thoughts from M: Given the amount of geometry in this game, I was shocked how much I like it. There’s some definite spatial reckoning as you try to construct your pens, so it was a challenge, but a pleasant one. There’s also some interesting potential for misdirection, because in order to protect the identity of your color, and thus prevent other players from actively seeking to thwart you, you have to be very intentional about appearing erratic and maximizing your potential enclosures before you reveal your color.

Petra rating: 9/10

M rating: 6/10